Welcome to our training series on performing your own CRISPR Cas9 experiment for gene knockout. Each week we’ll send you new instructional material including decision-making tools, protocols, and troubleshooting advice on how to design and carry out your gene knockout experiment.
This week we’ll talk about how to decide on a delivery method for your sgRNA and Cas9, and how to proceed with transfection/infection once you’ve decided.
So, you’ve decided on a Cas9 and designed your sgRNAs. Next you need to decide how to express those components in your target cells. Asking yourself the following questions can help you make your decision:
Luckily, no matter your circumstances, there is a delivery method that will suit your needs. abm offers a wide array of expression systems for CRISPR components.
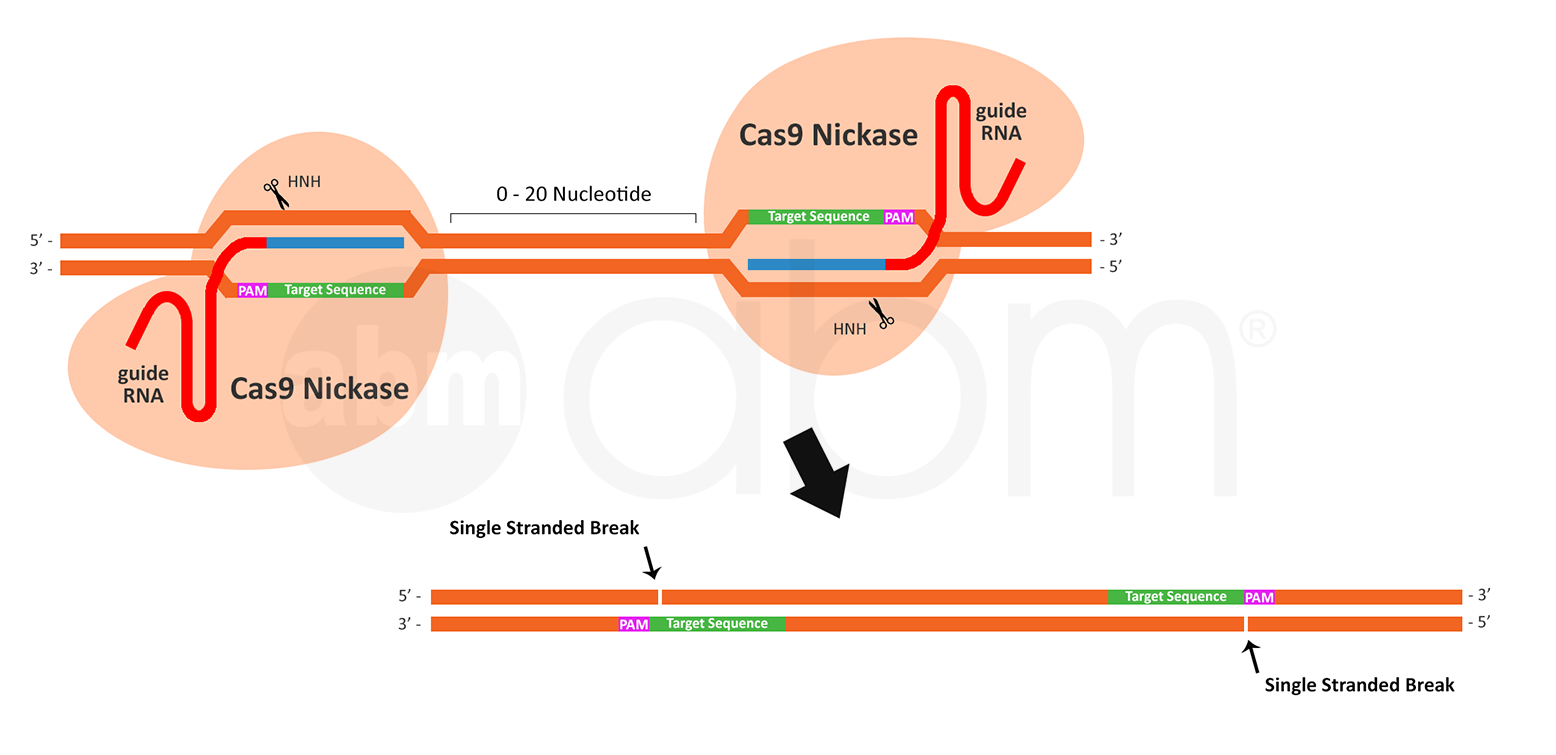
Further considerations need to be taken when using a paired Cas9 nickase to create a double stranded break. When designing sgRNAs for paired nickase activity, it is important to note the following:
| Expression System | Advantages | Disadvantages | abm Products |
| Non-Viral Vector / Plasmid |
|
|
sgRNA Non-Viral Vectors and spCas9 Non-Viral Vectors |
| Cas9-sgRNA Ribonucleo-protein (RNP) |
|
|
spCas9 and saCas9 proteins. |
| Lentivirus |
|
|
sgRNA Lentivirus, All-In-One Lentivirus, and spCas9 Lentivirus |
| AAV |
|
|
sgRNA AAV, All-In-One AAV, and saCas9 AAV |
| Adenovirus |
|
|
sgRNA Adenovirus and spCas9 Adenovirus |
| Cas9-Expressing Cell Line |
|
|
spCas9 Expressing Stable Cell Lines |
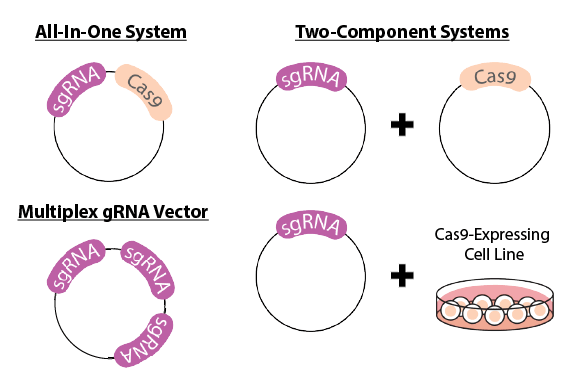
If you decide to proceed with a vector or virus-based delivery method, you have an additional choice between using a one-component (or, All-In-One) or two-component system.
An All-In-One System is one in which sgRNA and Cas9 are expressed from the same vector. This makes it easy to use and less expensive if only one experiment will be done. However, you can’t reuse the vector between different experiments or trying different sgRNAs.
Two-component systems will split expression of the sgRNA and the Cas9 into two separate vectors, or a vector and a Cas9-expressing cell line. The Cas9 vector or cell line can be re-used between experiments, and allows for more flexibility in trying different sgRNAs. However, this can be more expensive and complicated to use than an All-In-One vector.
Additionally, there is the option of using a multiplexed sgRNA vector. Multiplex vectors allow for the co-expression of multiple sgRNAs from one vector. This can be useful for the following applications:
Overwhelmed by the choices? abm has made a few tools to help you out.
Our specialized CRISPR Experimental Design Tool will give tailored recommendations for your CRISPR experiment, including suggestions for Cas9 and sgRNA delivery, controls, and methods for validation.
We also have a general Vector Selection Tool to help you decide between expression systems.
Depending on the application, proceed with a transfection or a transduction of the vector or virus into the cell line of interest. The following transfection and transduction procedures may serve as general guidelines for each delivery method.
Transfection Protocol
To monitor the success of transfection, it is highly recommended to perform transfection with the appropriate GFP control vector in parallel.
Packaging and Transduction Protocol
The transduction efficiency of mammalian cells varies significantly under different experimental conditions. This includes virus concentration, exposure time to the virus, and growth area of the well or plate used for the infection.
Note: If you plan on using sequencing as the primary method of validation and have multiple sgRNAs for 1 gene target, it is recommended to infect each sgRNA separately in different wells.
Day 1:
Seed cells one day before viral infection to achieve 20-30% density on day of infection. Incubate the cells at 37°C, 5% CO2 overnight.
Day 2:
You may need to optimize the Multiplicity of Infection or MOI (the number of virus particles/cell) of the virus you are using to achieve the highest transduction efficiency. MOI can be optimized by infecting your target cells with a reporter control virus then assessing reporter strength and cell health.
e.g. On the day of infection, cells should be at 20% density. If the virus titer is 107 IU/ml, the following volumes of virus can be added to 105 cells to achieve the below target MOIs.
| Volume of virus needed | Target MOI |
| 10 Μl | 1 Μl |
| 50 Μl | 5* |
| 100 Μl | 10 |
| 500 Μl | 50 |
*An MOI of 5 yields a good transduction efficiency for most cell lines
Therefore, to infect at an MOI of 1, use 10 μl of 107 IU/ml of virus to infect cells that are at 20% density. If the transduction efficiency of the target cells is low, add Transduction Enhancer at a 1:100 ratio (or at the optimized dilution ratio determined for the transduction). Keep the infected cells at 37°C, 5% CO2 for incubation overnight until ready for the drug selection step.
Day 3:
Incubate the cells for another 24-48 hr at 37°C, 5% CO2 to allow cells to recover.
If a vector with fluorescent reporter is being used, observe cells for infection signal at this time. If your vector confers resistance to an antibiotic, you can treat cells with that antibiotic. Only cells which have taken up the vector/virus will survive.
See our Drug-Selection Killing Curve guidelines for stable cell line generation using lentivirus. We also have a list of suggested MOIs for commonly used cancer cell lines.
Typically, lentivirus can be used at an MOI of 1, 5, 10, and 50. Usual AAV MOI ranges from 10 000 to 500 000, depending on serotype and cell type. Adenovirus MOIs can range from 1 to 50; for adenoviruses, abm has had good success by simply overlaying cells with viral culture supernatant (at ~106 GC/ml).
So, now you know how to perform your knockout experiment. But how do you isolate and verify correctly edited cells? Next week we’ll focus on methods of screening and validation of your CRISPR knockout.
Take our Week 3 Quiz, and graduate to becoming a Gene Expression Journeyman!
How did you do? Share your results with #CRISPRCrashCourse:
